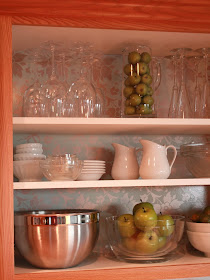
 I wanted a background color or pattern for the exposed back of our cabinets, but nothing permanent. I wanted to be able to change it as often as I like.
(visit the original post for the trial and error part of this project to see the amazing transformations and for tips on what not to do!)
I went to Hallmark and found THIS...

It was like it was all meant to be.
Adhesive backed paper meant that I wouldn't have to worry about getting the paper on the wall just right to line up with the tape and make sure it was flat and laid out as perfect as it could be.
I was a little worried when I opened it up because it turned out to be shiny paper. Yikes. Shiny paper gave me horrible results last time. But knowing that the entire piece would be sticking to the back of my cabinet, instead of only the spots that had been taped up, gave me hope.
In typical Hallmark fashion, the paper had cut lines on the back, so it was so easy to cut out the paper to the exact size that I needed it to be...

I stood on the chair, got on my knees up on the counter and pressed it into place.
Now, I don't want you to think that I'm yelling at you, except that I have to tell you...
IT WAS SO EASY!!

So easy.
It is perfectly flat, except where there are flaws in our cabinetry. But you would have to look closely to really see them. I see them only because I am now intimately familiar with the inside of our cabinets.
I put the shelves back in place, and all of the dishes back in and Viola, a whole new look...


Here you can see just how shiny the paper is, but turns out we actually like it. The shiny, reflective quality makes the kitchen feel lighter and brighter.
Bonus!


Would you believe me if I told you that this morning we were actually trying to figure out where else we could take doors off of cabinets?
We like it that much.


So there you have it:
(I wish you could all see it in person! It's just so pretty!)
The adhesive paper turned a project that was kind of a pain to get right, into something easy enough that I would let my 8 year old do it. He'd do a good job too!
(I wish you could all see it in person! It's just so pretty!)
The adhesive paper turned a project that was kind of a pain to get right, into something easy enough that I would let my 8 year old do it. He'd do a good job too!
•••
Thanks to Teri for this fun idea!
 To have your ideas featured on Crazy Domestic, click HERE


Very pretty! The print is perfect with your wall colour.
ReplyDeletewhat a great idea for open cabinets!
ReplyDeleteBeautiful! We've been trying to figure out a way to take some doors off of our cabinets, but our kitchen is so small we have to pack each cabinet tightly to keep all we need in it. However, I'm going to try again...I'd love to do what you did!
ReplyDeleteLove this idea, and looks so good in your kitchen. I hate our kitchen cabinets so may have to try this one!
ReplyDeletethis is GENIUS! I love it... wow.
ReplyDeleteWow! What a genious idea. The paper is beautiful and your kitchen looks incredible, like a magazine.
ReplyDeleteI'd love it if you could stop by my blog and check out my 1st giveaway!
http://theelephantstrunk42.blogspot.com/2010/12/v8-ambition-giveaway.html
I love the idea!thanks..
ReplyDeleteWhat is the paint color you used? I've been trying to pick a color for my kitchen, but it's so hard to visualize the finished product from the little paint chips! My countertops look the same as yours, so I think the combo is adorable!!
ReplyDelete